Photo by Arduino Robot official website
In this article, I'll explain how to try some samples and demos of the Arduino Robot.
0. Preparing for setting up
Before setting up the Arduino Robot, it needs a number of hardware below.
・Arduino Robot
・Peripheral accessories
- LCD screen for displaying images, texts, and control interfaces.
- Micro SD card(2GB)
- USB cable for connecting the Arduino Robot with computers.
- 4 rechargeable AA batteries.
The peripherals accessories above are included with shipment.
1. Downloading the Arduino IDE
To try some samples and demos of the Arduino Robot, it needs the Arduino IDE.
Please download and install it from the Arduino official website.
2. Setting up the Arduino Robot
Please set up the Arduino Robot with following procedure.
・Set 4 AA batteries in the right direction.
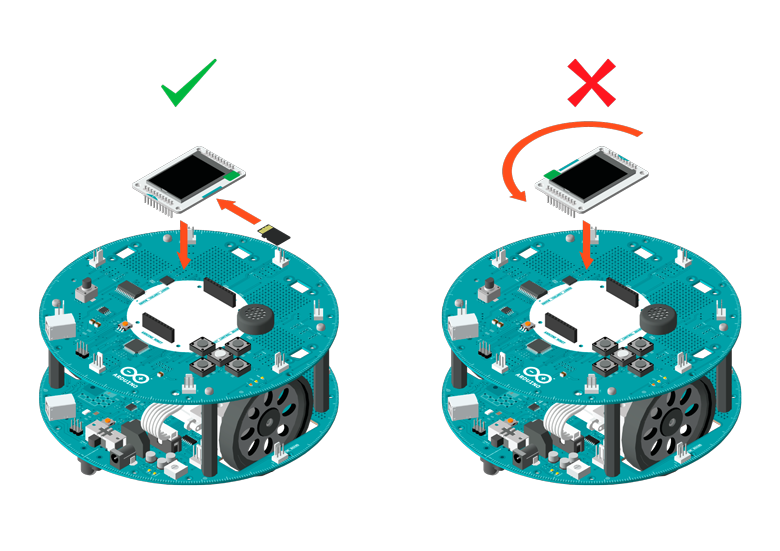
・Plug a micro SD card into a LCD with the right direction.
・Plug a LCD into the Arduino Robot with the right direction.
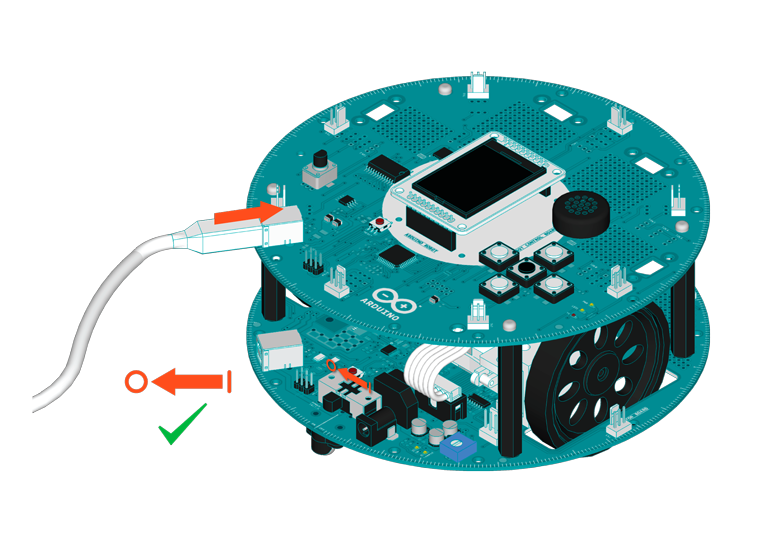
・Connect the Arduino Robot with a computer with a USB cable.
・Install drivers
Please install drivers for Windows/Mac.
Its installation procedure will start automatically after connecting the Arduino Robot with a computer.
Linux (Ubuntu12.04 / 13.10) doesn't need to install driver.
For more details, please refer to the official website to confirm the procedure above.
3. Trying samples & demos
Please run the Arduino IDE.
It includes some samples and demos.
Please open any exmaple or demo from the Arduino IDE below.


For example, you can try some samples and demos as follows.
・Control motors
・Make a short beeping sound
・Play a melody
・Display texts on a LCD screen
1. Downloading the Arduino IDE
To try some samples and demos of the Arduino Robot, it needs the Arduino IDE.
Please download and install it from the Arduino official website.
2. Setting up the Arduino Robot
Please set up the Arduino Robot with following procedure.
・Set 4 AA batteries in the right direction.
・Plug a micro SD card into a LCD with the right direction.
・Plug a LCD into the Arduino Robot with the right direction.
・Connect the Arduino Robot with a computer with a USB cable.
・Install drivers
Please install drivers for Windows/Mac.
Its installation procedure will start automatically after connecting the Arduino Robot with a computer.
Linux (Ubuntu12.04 / 13.10) doesn't need to install driver.
For more details, please refer to the official website to confirm the procedure above.
3. Trying samples & demos
Please run the Arduino IDE.
It includes some samples and demos.
Please open any exmaple or demo from the Arduino IDE below.
For example, you can try some samples and demos as follows.
・Control motors
・Make a short beeping sound
・Play a melody
・Display texts on a LCD screen
・Upload a sample or demo
After selecting a sample or demo, click the "Upload" button or Ctrl + U key to upload.
If the upload is successful, the message "Done uploading." will appear in the status bar of the IDE.

・Disconnect a USB cable
Please disconnect a USB cable from the Arduino Robot after uploading.
・Switch on
Please switch on the Arduino Robot and check its behavior.
For more details about samples, demos or the procedures above, please refer to the official website.
In this article, I explained how to try some samples and demos of the Arduino Robot. I would like to explain how to blink a LED with I/O pin in the next article.
No comments:
Post a Comment